NOTE: PLEASE CONTACT ME WITH ANY QUESTIONS THROUGH MY CONTACT PAGE AS THEN I GET NOTIFIED STRAIGHT AWAY UNLIKE THE COMMENT SYSTEM WHICH I HAVE TO CHECK MANUALLY
The TT520 Speedlite is a relatively cheap alternative to the big brands own products. I purchased this one for a mere £28 and within a few days I felt is not only suited my needs but went beyond. By searching the web I found out this Speedlite can be purchased from many different brands or no brand at all, mine personally came with the well known brand Neewer on the front. The Flash offers a wireless function for off camera work and this is why a flash stand is included in the box with a cheap 'velvet' cover to protect the Flash. The speed of the flashes include 1/128, 1/64, 1/32, 1/16. 1/8, 1/4, 1/2, 1/1. The flash comes with a in-built diffuser and reflector, plus the flash can be rotated 90 degrees in one direction and 180 in the other. It will also angle upwards from 0 degrees to 90 degrees with a few marks on the body to show you the angle you are positioned at. Please read on to explore more features and the features above in more detail.
 |  |
Modes
   | M - ManualPress the MODE key to M, in this mode you can set the speedlite on your camera's hot-shoe or speedlite trigger hot-shoe to trigger the flash unit. When shooting you can adjust the flash power and press the camera shutter, it will flash simultaneously with the camera's signal. On the hot-shoe mount on the bottom of the flash it has a metal dot in the centre, this connects with the top of the hot-shoe and is where the signal is passed into the camera. . S1 - Slave 1Press the MODE key to S1, this mode is for 'Slave' flash in order to create many lighting effects. It is still manually configured and set up although can be triggered wirelessly. When in this mode the flash fires synchronously when the master flash fires. The master flash however is only the signal and hardly creates any light on the subject captured in the image. The disadvantage is the red sensor has to be in line of sight with the master flash. However this can be overcome with 'angles' explained later. Check your personal camera's manual for wireless firing. . S2 - Slave 2Press the MODE key to S2, the mode is applicable for slave flash to once again create many lighting effects. The flash won't flash synchronously with the first flash but the second flash from the master flash, which is the second flash synchronization. NOTE:
|
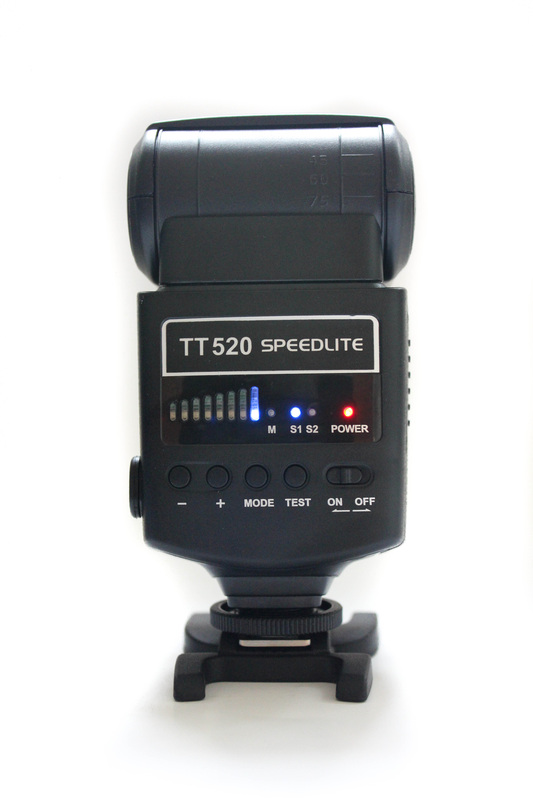
Buttons
- On/Off changes whether the flash is on or off. At start up it will take a few seconds for it to power up after which the power indicator turns red and the Speedlite is ready to shoot. After use turn the device off by sliding the switch to 'Off'
- The Test button is simply to try a test flash.
- If the red power button flickers every 1 second, it indicates low battery. In this case the power will automatically turn off and you will need to replace the batteries.
- The MODE button changes the mode between M, S1 and S2 who's functions can be found above under 'Modes'
- the + and - buttons change the light on the blue LED bar, which indicates the speed of the flash. The speed of the flashes are indicated from left to right in this order 1/128, 1/64, 1/32, 1/16. 1/8, 1/4, 1/2, 1/1

 | Inputs/OutputsThere are only two and the first on the left of the picture is a charging socket for charging rechargeable batteries inside the product (Don't charge non-rechargeables!) The second is a PC Sync Socket, if you don't know what one of these is then it basically is a very simple cord. When using a Flash off camera and you don't want to wirelessly trigger it then you use this cable which makes the flash act like it is in manual and on top of the camera. So it simply communicates the fire signal from the camera to the flash. |
In built featuresI felt this was a really important bit to cover as most shops don't include this in their description. I don't want you to buy another diffuser with your purchase if you don't realize it comes with one. At the top of the flash 'exit' you can pull out a plastic bit, this brings out a 'reflection board' and 'wide panel'. The wide panel enlarges the flash lighting range so you achieve a more softened and natural lighting. The reflection board/diffuser will produce a highlighted point on the eyes of the subject and thus make the eyes 'charming'. The instructions say this function reaches optimal effect when the flash head is up 90 degrees P.S. sometimes if you push the diffuser in too far it can be difficult to get back out. What I do is push the diffuser back in with the reflector and this normally solves my problems. Although If you do then get it stuck what I do is pull the reflector in and out a few times - eventually leaving it out - until the diffuser has come up enough that I can pull/tweak it out using a thin metal wire - I normally use a LED leg as I have these to hand. The hole at the top of the diffuser helps you to get hold of it. |   |
 | OtherFirstly I must point out that even though this is a budget product the box it is supplied in is very professional looking. On the side it has all the specs and it is tightly but safely backed inside. The Flash comes in a 'velvety' sort of case/bag that is nice but will only really keep it clean from dust. Otherwise apart from the main body of the flash itself you only get one other object which is a hot-shoe stand. It is designed to mount the flash onto when shooting wirelessly and is a really useful bit of kit. It is quite sturdy and I found that it is really useful especially for my product photography when for example I have a mic that I need to take photos of and can't get it to stand up. Well because it has a hot shoe it mounts perfectly onto this and I can stand it up creating great pictures! At the bottom of the stand there is a tripod mount screw socket. So you can either mount the flash on a tripod when shooting wirelessly or on an umbrella stand e.t.c. I think this tripod mount will be best used in conjunction with other flashes in a studio type situation. |
 |  |
When using the Flash you have to mount it either onto the camera hot-shoe or the stand provided, anyway to secure the speedlite just twist the lock anti-clockwise to loosen it to the highest point and then slide the mounting foot into the hot-shoe. Twist the lock clockwise to tighten it and to remove the flash twist it again anti-clockwise before taking it off.

Angles
  | The Speedlite offers a surprisingly wide range of angles and comes with the angles marked on the body of the flash. Firstly it can be adjusted from 0 degrees (facing straight in front) to 45, then 60, 75 and finally 90 degrees. This helps change exposure and flash back (shine) on the subject. When rotating it is different for both sides, when rotating to the left the flash will only go up to 90 degrees (0-30-60-90), if your confused to why you would use it at this angle it is the same for the vertical changes explained above but basically for when you are doing portrait photography. So 0 degrees directly faces the subject then slowly you are bringing the flash to reflect from above i.e. the ceiling. When rotating to the right it goes to 90 degrees through 30 and 60 degrees, this part is the same as rotating to the left although it acts for when you are holding the camera the other way round. The rotation also continues onto 120, 150 and 180 degrees. I would use 180 degrees and point the flash up vertically around 75 degrees for shooting a subject when I want softer light and can reflect the flash of a wall behind me. My favorite position is 180 degrees 'horizontally' and 90 degrees vertically with the diffuser up. This means the light hits the diffuser and bounces onto the subject creating even lighting and tone. |
Power
The module takes 4 standard AA batteries or 4 rechargeable AA batteries. The slot for the batteries can be found on the side of the device where little 'bumps' make it easy to open. You can feel that the quality and sturdiness isn't quite up to scratch but personally I feel for the price it is what I expected and I don't think you would actually break it as long as your careful to a certain extent. The flash has a diagram of which way round the batteries go which is useful especially if you didn't have the instruction leaflet on you. Finally the Speedlite does have a charger socket but so far I haven't seen a charger advertised for this particular product and it would only work with rechargeable batteries. Therefore I suggest either carry spare batteries with you to a photoshoot or charge the batteries up before you leave.
 |  |
Logos - But you'll cope
You can buy unbranded TT520 Speedlite's but most come with a brand on it, I don't mind because on a normal flash you would have the brand on it e.g. Canon and so it doesn't bother me. It isn't too big and then on the underside of the flash it has the logos for trading and discarding of the product. As long as you don't care too much about having a cheap brand logo on it you'll be fine - personally I only think other photographers will realize it is a cheaper flash gun and the general public will think your more professional than the average DSLR goer these days (As there are a lot of them!)
 |  |
Comparisons
 | Normal - No FlashWithout a flash the direction of light from the window will make all the difference. In this picture the shadows of the microphone are bold and the background and floor are totally different shades and exposures. Often without a flash the camera shutter has to be on for longer even if you shoot at the same ISO and therefore that could result in a slight blur or if you do shoot at the same shutter speed then the picture will be under-exposed and the sharpness won't be as good. |
 | In-Built FlashAlthough you can manually adjust your in-built flash, still the results aren't brilliant. This picture was taken with automatic flash where you can see clearly from the picture the shadows are harsh and if the product body is plastic the flash shows this. If you look in the grooves you can see dark, bold shadows and the flash is reflected slightly from the product. The background is now more similar to the floor but there is still a difference. I would say that this is worst than no flash. |
 | TT520 SpeedliteI think you can automatically see the improvement. There are no harsh shadows and the product is all evenly exposed with little if no flash back. The background now flows with the floor and the final image is much more professional to showcase your product. You can shoot easily at ISO 100 and still retain a sharp, clear image. I took this with the diffuser on and the amount of light outputted can be controlled and so you have more control over the final image. |
Test Images
A selection of test images from a product shoot to just normal images. Most were taken in the evening and you can see the flash totally abolishes any yellowy tungsten light. Also on the same settings without the flash these images were really dark and un-usable showing why I personally believe every photographer needs a flash.
RATED - SILVERI have rated this product with a silver medal for a few reasons. The price of this product is outstanding for what you receive and it is a great Slave flash. It was not awarded a higher medal due to the unit using up batteries quickly and being slightly less well made in parts. There was no indication to where I could buy a power cable or PC sync and in moving forward I would like to see a product which is unique to one brand and is not confusing when you see it elsewhere on the market place under a different brand name. Apart from these small points I would recommend this flash for 'amateurs' and I have used it in school photography when inside a poorly lit sports hall. The results were noticeably different although I feel a more expensive Flash unit could to a better job at a lower ISO. |  |
 RSS Feed
